Today was so amazing! I made tarts for the first time and since my mom couldn't eat much flour, I decided to make the next best thing she likes, that is cheese! Cheese tarts! They are so amazing. I got the recipe of the cheese from YC and the shortcrust pastry from another website. However I made some alterations that I think will be useful.
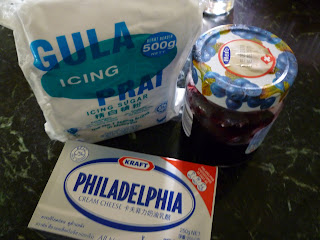
For the cream cheese filling, you only need some icing sugar, philadelphia cream cheese (the only brand I can find) and some blueberry jam.
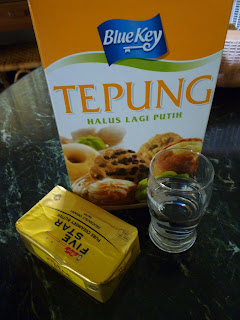
For the shortcrust pastry, you need plain flour, preferably without it raising by itself, half a block of butter and some water.
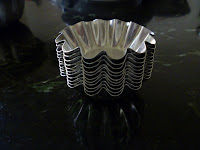
You want to use small moulds if you want a cute shape. I used these because it was lying around the house.
 For the shortcrust pastry:
The butter must always be half of the amount of flour used
For e.g, I used 250g of flour with 125g of butter. This makes about 40 cheese tarts I think.
1. Weigh 250g of flour using a weighing scale
2. Using a small sift, sift the flour into a mixing bowl
3. Ensure the sift is at a high enough distance from the bowl to incorporate more air into the flour.
4. Do the above in a non windy area
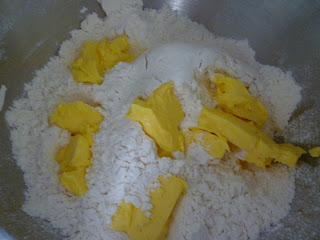
Ensure the butter is at room temperature and is soft enough to be indented by a knife at a touch.
1. Cut up the butter into cubes and toss into the flour.
2. Using a baking spatula or the knife, cut and blend the
butter into the flour until a good mix
3. Use your fingertips to rub the butter gently into the
flour until the batter looks crumbly (almost like biscuit)
I couldn't get any photos for this part cause my hands were put to full use. Once the batter is biscuity, add a tablespoon of cold water into the mix and try to stick the batter together with your hands. The aim is to form a dough. Repeat this process until the batter forms a good dough (neither too sticky nor crumbly). For final touches, dip your fingers with the water to dab the crumbly parts of the dough. Then, wrap up the dough in clingwrap (plastic wrap) and let it set in the fridge for 30 min or more.
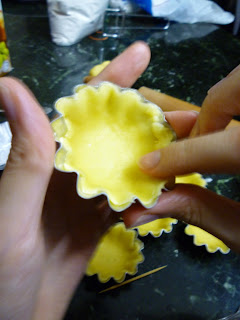
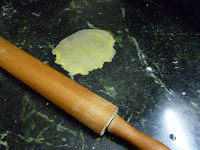
Once the dough is set, take it out of the fridge and break off a small section of the dough to a suitable size according to your mould. Roll up the dough into a ball and roll it out using a rolling pin. (whoa, rolling). Make sure the rolling pin is dusted with flour as well as the surface you are doing the rolling on to prevent the dough from sticking. Then, place it into the mould, gently pressing it into shape and remove the edges.
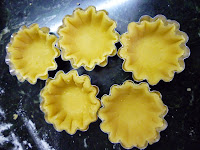
<= Eventually, it will all look like this! Bake the bases in the preheated oven at 175 degrees for about 10 min or until the edges become light brown.
Cream Cheese Filling: 1. In a mixing bowl, cut up soft cream cheese.
2. Add icing sugar (or condensed milk) and mix the mixture. Add the sugar according to your taste. About 60g of icing sugar or 4 teaspoonfulls of condensed milk.
3. I added a dash of milk to make it smoother. But I recommend you to used 1 whole lemon juice (from a real lemon duh!) because cheese smells a bit so the lemon really takes the smell away. I had to get rid of the smell using vanilla essence, which is not a bad option.
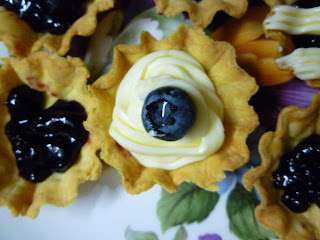
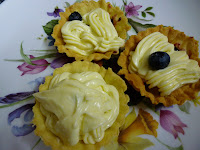
With the baked tarts, remove them from the mould and put it onto a pretty plate. Spread blueberry jam on the bases because you want the filling at the bottom (optional)

And with a piping equipment, pipe the cream cheese on with any decoration you like and simply add some fruit on the top because it makes the tart more tasty, pretty and less rich.
____________________________________________________________________

And if you're crazy you can pipe funny things on it. This is not an apology tart! This is a request from my sis and my cousin to write Sorry: song from Suju and Gee: song from SNSD. Google it! :D


 Today we made some bite sized snowskin mooncake! It tasted really good and we had a variety of them, we made plain snowskin with lotus or red bean filling. And we also made green tea flavoured ones. :D


